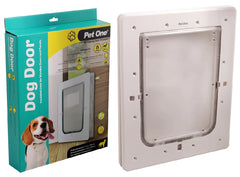
DIY dog doors are the perfect choice for a timber door installation. These doors are rugged, strong and built to last. There is a wide range of custom doors available as well. Consider your security needs, you may want to purchase a dog door that has a locking mechanism included.
Installing a dog door may seem like a daunting task, but with the right tools and know-how, anyone can learn to install a dog door in their timber door. Follow these steps and you'll have your doggy portal in no time!
Before Purchasing a Dog Door, Measure Your Door and Dog!
Before you begin any installation work, you must measure the existing door and get the right sized dog door. Measure both width and height of your timber door and make sure to factor in weather stripping or moldings. Once you have the measurements, use them to purchase a pet door that fits perfectly - ensuring neither your pup nor the elements escape through any gaps.
If you are looking to install a dog door in a timber door that is able to cope with  both hot and cold climates, then this one will be a good choice. The Pet One Polycarbonate Dog Door is made of polycarbonate materials which is tough and robust - making it perfect for keeping your pet safety. The two way locking system helps control your pet’s movement, while the two easy sliding latches offer added security. The self-closing flap and brush weather seals help keep draughts out, while the high impact polycarbonate UV-stabilized flap is virtually unbreakable. This DIY dog door installation is compatible with wooden doors and panels Max recommended door thickness is 53mm. Available in 3 sizes:
Trace the Template onto Your Timber Door.
Using a pencil, place the template onto the door and trace around it. Each dog door sold for timber door installations comes with a template. Then carefully remove the template and use a jigsaw to cut along the lines you have just traced - making sure to cut all the way down through both sides of the door. If necessary, sand all rough edges using an orbital sander or fine-grain sandpaper.
Cut Out the Appropriate-Sized Hole in the Door With a Jigsaw.

Next, you will need to position the dog door insert inside the hole you have just cut out. If necessary, use a plane and chisel to adjust the edges of the hole so that it is a perfect fit for your dog door insert. Once your insert fits snugly, screw it in place with appropriate-length screws into the corners and around the edges of your insert to keep it secure.
Smooth Out the Edges With Sandpaper and Install the Dog Door’s Frame into Place and Secure it in Place With Nails or Screws.
Use fine-grit sandpaper to smooth out the edges of the hole you have cut in your door. Make sure the hole has a nice finish around the edges and try to fill any rough spots with wood putty before proceeding. If necessary, remove or reposition the dog door insert until it fits perfectly, then position and secure it firmly into place with nails or appropriately-sized screws. You should also use a caulking gun to seal up any gaps between your insert and the frame of your door.
Install Weather Stripping Around the Edge of Inserted Frame and Attach the Protection Plate on the Exterior Side of the Wall Near the Leg Position (Optional).
As an added step to secure better insulation, you can install weather stripping around the edge of the insert to prevent drafts and water damage. You should also attach a protection plate on the exterior side of your wall near the leg position. This plate will help protect the integrity of your door from any potential intrusion or damage. Use a drill and firmly attach it in place with appropriate screws or nails.
Finally, follow our dog training guide on how to train your dog to use their new doggy door!
© weknowpets 2023


