
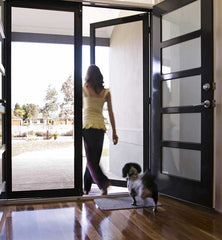
Installing a dog door into a security door can be a complex task, but with the right tools and some persistence, you can do it! Find out what materials and steps you need to take to successfully complete this project with this comprehensive guide. In no time at all you and your dog will enjoy the benefits of a fully functional dog door!
What are the benefits of Installing A dog Door?
Installing a dog door can have several benefits, both for the dog and its owner:
-
Convenience: A dog door allows your furry friend to come and go as they please, which means you don't have to be available to open and close the door for them. This can be especially useful if you are away from home for long periods, or if your dog needs to go outside frequently.
-
Improved toilet training: If you are potty training your dog, a dog door can be a great aid. It allows your dog to go outside whenever they need to, which can help reduce accidents in the house.
-
Increased exercise: A dog door allows your dog to have more freedom to move around and play outside, which can lead to more exercise and better physical health.
-
Reduced boredom: Dogs that are stuck inside all day can become bored and develop destructive behaviors, such as chewing on furniture or shoes. A dog door allows your dog to go outside and explore, which can help keep them entertained and mentally stimulated.
-
Enhanced independence: Giving your dog the freedom to come and go as they please can help promote independence and confidence in your furry friend.
Plan Your DIY Dog Door Project.
Before you get started on your project, be sure to have all the necessary materials and tools to hand. Gather the measurements of your dog door frame and make a plan of where you will locate the pet door. Measure twice, cut once! Read the instructions carefully before you begin Taking these steps before jumping into installation will help ensure a successful project.
Measure the size of your dog before you install a dog door, here's how:
To get the correct size for your dog, start by measuring the width of your pet at the hips and the shoulder. The larger measurement of the two is the size to go for and then add an additional 5cm for dogs and 3cm for cats to ensure the correct size. When installing the door, the correct height is 1-2cm below the belly of your pet.
Need to install a pet door into your security screen door but don't know where to start?
Look no further than the Pet One Dog Door for glass and screen doors in
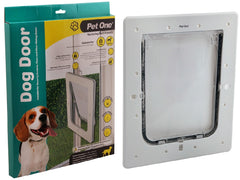
Australia. This range of pet doors is suitable for dogs of all sizes:
This range of dog doors has a 2-way manual locking system (in/out, locked), comes with two additional security latches for added security, plus is constructed of UV-stabilised polycarbonate making it virtually indestructible! Additionally, this pet door is fitted with weather brush seals, is suitable for both screen and glass doors (though installation by a professional glazier is recommended), and even adapts well to safety glass applications.
Gather the Supplies You Will Need.
This includes purchasing the correct dog door for installation in a security door. The box and the product description will provide the size you need, the type of door you can install in, and how to measure your dog correctly for size. We have more tips on choosing the correct pet door here.
Before you begin the installation process make sure to have all the necessary materials and tools to hand. You will need a pet door of your desired size, a drill, drill bits, screws, caulking gun and caulk, a utility knife, a chisel or sandpaper, and a jigsaw (for circular door cuts). Make sure you take into consideration any additional supplies that may be needed for making adjustments or modifications to your door depending on the specific make and model.
Measure and Cut the Door Opening.
After you have gathered all your materials and tools, it’s time to measure the area of the door where you plan to install the pet door. You'll want to create a template of the opening area first before you start cutting. Use your drill set to make the correct size holes for your pet door insert at the ends of your template outline. Once that is complete take out your jigsaw and cut along the lines of your template until you have created an oval-shaped opening in your security door.
Assemble the Dog Door Parts.
After the opening has been made, it's time to begin installing the pet door. Take the two parts of the plastic frame that came with your door and fit them tightly together around the top of the hole you made in the security door. Use screws to secure them in place. You may need to make adjustments at this point if the thickness of your door is outside of what was specified by your pet door manufacturer. Next, insert the weather-resistant seal into each side panel, then attach it to both halves of your pet door’s frame. Finally, install the locking lever and handle onto each side panel.
Hang and Align the Dog Door Panel.
Once the frame is securely attached to your security door, it's time to hang and align the dog door panel. To do this, insert screws into each side panel and make sure that they are flush with the exterior of your security door. Place two pieces of wood against the opposite sides of the pet door panels and use a level to ensure that it’s correctly aligned. Then, tighten all the screws until both halves are firmly in place on either side of your security door.
Finally, follow our dog training guide on how to train your dog to use their new doggy door!
© weknowpets 2023